Difference between revisions of "Real Flight Simulator"
(→8 Release Note) |
|||
| (198 intermediate revisions by the same user not shown) | |||
| Line 1: | Line 1: | ||
| + | <translate> | ||
| + | |||
| + | <!--T:47--> | ||
Welcome to the official user manual for Real Flight Simulator. | Welcome to the official user manual for Real Flight Simulator. | ||
| − | [ | + | <!--T:48--> |
| − | + | [https://www.youtube.com/playlist?list=PLCSy6-pa82n0kwiJFeAIfyKu8bpC8OVRx '''Tutorial videos: www.youtube.com/RORTOS] | |
| − | - | + | |
| − | - | + | <!--T:49--> |
| − | + | <gallery widths="450px" heights="337px" perrow="3"> | |
| + | File:RFS Manual UI HOME 2.png|Main menu | ||
| + | File:RFS Manual UI GAME 2.png|In flight user interface | ||
| + | File:NewMenuAircraftBlur.png|Aircraft and liveries | ||
| + | </gallery> | ||
| + | |||
| + | == 1 FLY NOW == <!--T:50--> | ||
| + | <div id="1_Fly_Now" style="display:inline;"></div> | ||
| + | |||
| + | <!--T:51--> | ||
Quickly enter the flight simulator | Quickly enter the flight simulator | ||
| − | + | === 1.1 Plane selection === <!--T:52--> | |
| − | + | <!--T:53--> | |
| + | <gallery widths="450px" heights="337px" perrow="3"> | ||
| + | File:NewMenuAircraft.png|Aircraft menu | ||
| + | File:NewMenuLivery.png|Liveries menu | ||
| + | </gallery> | ||
| − | Choose | + | <!--T:54--> |
| − | Change livery by tapping on the arrows at the sides of the livery name or tap on the | + | Choose an airplane from the list on the left. You can add planes and liveries to your favorites by selecting the star icon close to their name.<br/> |
| + | Change livery by tapping on the arrows at the sides of the livery name or tap on the "Liveries" tab to open the complete list. | ||
* CONFIRM: Proceed to route selection | * CONFIRM: Proceed to route selection | ||
* BACK: Back to main menu | * BACK: Back to main menu | ||
| − | * CREATE LIVERY: Proceed to web page [http://www.realflightsimulator.org/liveries | + | * CREATE LIVERY: Proceed to web page [http://www.realflightsimulator.org/liveries RFS Liveries] to download livery templates (needs graphical package supporting .psd file format). Tutorial video instructions: https://youtu.be/FmwjD-TCS4E<br/> |
| − | |||
| − | |||
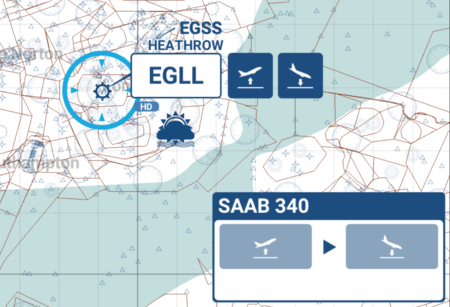
| − | Zoom in or | + | <div id="RouteSelection">=== 1.2 Route Selection ===</div> |
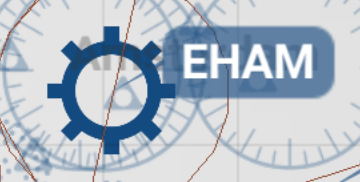
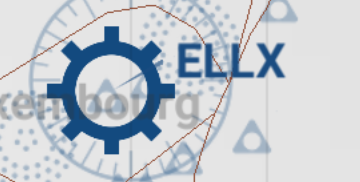
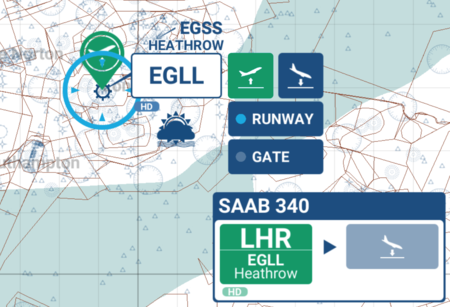
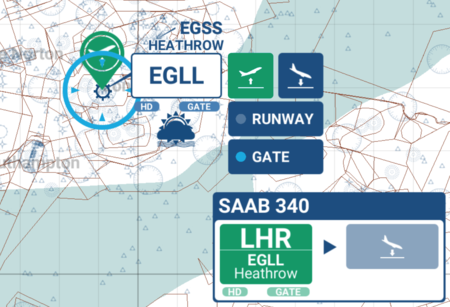
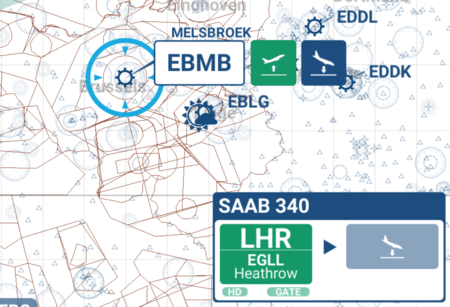
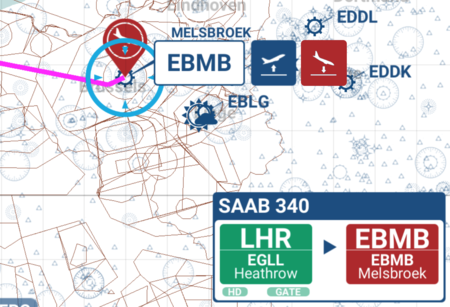
| − | Select an airport on the map by tapping on | + | <!--T:55--> |
| − | Choose | + | [[File:FlightPlan.png|700px|none|middle|thumb]] |
| + | Zoom in or out by pinching the map, smaller airports appear by zooming in more.<br/> | ||
| + | Select an airport on the map by tapping on its ICAO code or search it using the ICAO Search button.<br/> | ||
| + | Choose takeoff or landing by tapping on the icon to the right of the airport name, tap again to cancel it.<br/> | ||
| − | '''Airports | + | <!--T:56--> |
| + | '''Airports types:''' | ||
| + | <!--T:57--> | ||
<gallery widths="360px" heights="182px" perrow="3"> | <gallery widths="360px" heights="182px" perrow="3"> | ||
File:HD.png|HD|HD Airport | File:HD.png|HD|HD Airport | ||
| Line 32: | Line 52: | ||
</gallery> | </gallery> | ||
| + | <!--T:58--> | ||
'''HD Airport - Selection''' | '''HD Airport - Selection''' | ||
| + | <!--T:59--> | ||
<gallery widths="450px" heights="307px" perrow="3"> | <gallery widths="450px" heights="307px" perrow="3"> | ||
| − | File:HD Airport 01.png|HD Airport 01| | + | File:HD Airport 01.png|HD Airport 01|No selection |
| − | File:HD Airport 02.png|HD Airport 02| | + | File:HD Airport 02.png|HD Airport 02|Start from RUNWAY |
| − | File:HD Airport 03.png|HD Airport 03| | + | File:HD Airport 03.png|HD Airport 03|Start from GATE |
</gallery> | </gallery> | ||
| + | <!--T:60--> | ||
'''SD/LD Airport - Selection''' | '''SD/LD Airport - Selection''' | ||
| + | <!--T:61--> | ||
<gallery widths="450px" heights="307px" perrow="3"> | <gallery widths="450px" heights="307px" perrow="3"> | ||
| − | File:EBMB 01.png|EBMB 01| | + | File:EBMB 01.png|EBMB 01|Start from runway |
| − | File:EBMB 02.png|EBMB 02| | + | File:EBMB 02.png|EBMB 02|Land on runway (Taxi to gate if HD Airport) |
</gallery> | </gallery> | ||
| − | + | <!--T:62--> | |
| − | * | + | * START FLIGHT: Take control of the airplane |
| − | * BACK: Back to | + | * RESET: Clear airport selection |
| + | * BACK: Back to airplane selection | ||
| + | |||
| + | <div id="3_Real_Time_Flights" style="display:inline;"></div> | ||
| + | == 2 REAL TIME FLIGHTS == <!--T:63--> | ||
| + | |||
| + | <!--T:64--> | ||
| + | Search for real flights and fly them.<br/> | ||
| + | Zoom in or out by pinching the map.<br/> | ||
| + | Search for an aircraft using the search bar by entering the aircraft type or flight ID. <br/> | ||
| + | Click on any aircraft on the map to display the flight information.<br/> | ||
| + | |||
| + | <!--T:65--> | ||
| + | [[File:RealTimeFlight.png|600px|none|middle|thumb]] | ||
| + | * CONFIRM: Go to the aircraft page and select the aircraft livery, then proceed to START FLIGHT | ||
| + | * BACK: Back to main menu | ||
| + | |||
| + | <!--T:160--> | ||
| + | <div id="2_Advanced_Flight_Planner" style="display:inline;"></div> | ||
| + | |||
| + | == 3 ADVANCED FLIGHT PLANNER == <!--T:66--> | ||
| − | + | <!--T:67--> | |
| − | Plan carefully your flight plan and execute it | + | Plan carefully your flight plan and execute it. |
| + | [[File:AdvancedFlightPlanner.png|700px|none|middle|thumb]] | ||
| − | + | === 3.1 File selection === <!--T:68--> | |
| + | <!--T:69--> | ||
Choose an existing plan from the list on the left or choose an option from the top bar. | Choose an existing plan from the list on the left or choose an option from the top bar. | ||
* NEW: Create a new flight plan | * NEW: Create a new flight plan | ||
| − | * DUPLICATE: Create a copy of the | + | * DUPLICATE: Create a copy of the selected flight plan |
| − | * EDIT: Edit | + | * EDIT: Edit selected flight plan |
| − | * DELETE: Delete | + | * DELETE: Delete selected flight plan |
| − | * START FLIGHT: Start the | + | * START FLIGHT: Start the selected flight plan |
* BACK: Back to main menu | * BACK: Back to main menu | ||
| + | === 3.2 Edit/New === <!--T:70--> | ||
| + | [[File:EditNew.png|700px|none|middle|thumb]] | ||
| + | : '''GENERAL''' | ||
| + | ::* TITLE: Insert the title of your flight plan | ||
| + | ::* DESCRIPTION: Insert the description of your flight plan | ||
| + | ::* TAGS: insert any tags of your flight plan separated by a space (example: “Asia Rain Singapore”) | ||
| + | : | ||
| + | :'''DATE/TIME''' | ||
| + | ::* CUSTOM/REAL: Choose real time or customize any setting | ||
| + | ::* DATE: Tap on the date to change it | ||
| + | ::* TIME: Move the slider to change it | ||
| + | :'''FLIGHT PLAN''' | ||
| + | ::* See your planned route. Tap on EDIT to create/change your route | ||
| + | :: [[File:RFS_FlightPlan2.png|700px|none|middle|thumb]] | ||
| + | ::* Select departure and arrival airports | ||
| + | ::* Choose DEPARTURE to set the SID procedure (HD airports includes Transitions) | ||
| + | ::* Choose ARRIVAL to set the STAR procedure (only HD airports) | ||
| + | ::* Choose APPROACH to set the landing runway | ||
| + | ::* Choose ADD LEG to add a new leg up to a maximum of 5 | ||
| + | ::* Choose REMOVE LEG to remove a leg | ||
| + | ::* Tap on any leg to edit the flight plan for that leg | ||
| + | ::* BACK: to ignore changes | ||
| + | ::* CONFIRM: to set your flight plan | ||
| + | :'''AIRCRAFT''': View the airplane you have selected | ||
| + | ::* CHANGE: change your airplane | ||
| + | ::* FUEL: Move the slider to change quantity | ||
| + | ::* PASSENGERS: Move the slider to change quantity | ||
| + | ::* CARGO: Move the slider to change quantity | ||
| + | :'''METAR''': Sets your weather | ||
| + | ::* CUSTOM: move sliders to change weather settings | ||
| + | ::* REAL: real weather conditions | ||
| + | ::* RANDOM: random weather conditions | ||
| + | |||
| + | <div id="4_Multiplayer" style="display:inline;"></div> | ||
| + | == 4 MULTIPLAYER == <!--T:71--> | ||
| + | Real time Multiplayer | ||
| − | + | <!--T:72--> | |
| − | : | + | [[File:RFS_Manual_Multiplayer_Server.png|400px|none|middle|thumb]] |
| − | : | + | Choose MY PROFILE to manage your stats and rank. Each complete flight with take off and landing will earn you Flight Points (FP).<br/> |
| − | + | Choose VIRTUAL AIRLINE to manage your Virtual Airline.<br/> | |
| − | + | Choose an available server from the list.<br/> | |
| − | + | Join ATC (Beta) for playing as ATC or Pilot.<br/> | |
| − | + | ||
| − | + | <!--T:107--> | |
| − | + | Follow this link [https://youtu.be/q3MAwZQ0WuA Basic functions of human-controlled ATC] for watching the tutorial.<br/><br/> | |
| − | + | ||
| − | + | <!--T:73--> | |
| − | + | [[File:RFS_Manual_Multiplayer_Map.png|400px|none|middle|thumb]] | |
| − | + | Zoom in/out to see where other pilots are flying, tap on any airplane to see pilot details. | |
| − | + | Set your flight plan and START FLIGHT.<br/><br/> | |
| − | : | + | |
| − | : | + | <!--T:105--> |
| − | + | [[File:RFS_multiplayer_infobox.png|400px|none|middle|thumb]] | |
| − | : | + | Tap on any airplane to see pilot details. |
| − | + | ||
| − | + | <!--T:108--> | |
| − | + | <div id="5_Other_Options" style="display:inline;"></div> | |
| − | : | ||
| − | |||
| − | |||
| − | : | ||
| − | == | ||
| − | |||
| − | + | == 5 OTHER OPTIONS == <!--T:74--> | |
| − | + | [[File:Other Options.png|700px|none|middle|thumb]] | |
| − | |||
| − | + | <div id="5.1_Resume_Last_Activity" style="display:inline;"></div> | |
| − | + | ===5.1 RESUME LAST ACTIVITY=== <!--T:75--> | |
| − | + | You can use this button to quickly resume your last flight where you left it. | |
| − | == | + | <div id="5_Settings" style="display:inline;"></div> |
| − | + | ===5.2 SETTINGS=== <!--T:76--> | |
| − | ---- | ||
| − | |||
| − | ; | + | <!--T:104--> |
| − | :* | + | ; SYSTEM |
| − | : | + | :* QUALITY: 3D world detail quality, lower it if you have frame rate or stability problems |
| − | :* | + | :* NATIVE RESOLUTION: Activates device native resolution (Only Android devices). May decrease frame rate performance |
| − | :* | + | :* IN FLIGHT UI: ON=in game UI always displayed; OFF=in game UI appears only when touching the screen |
| − | : | + | :* CLEAR CACHE: Resets the cache of downloaded data, clear it only when you are having problems with excessive app size or corrupted textures |
| − | + | :* SATELLITE TERRAINS: Turn on/off high definition worldwide satellite terrains | |
| + | :* SATELLITE HEIGHTMAPS: Turn on/off high definition worldwide heightmaps | ||
| + | :* REAL TIME AIR TRAFFIC: Turn on/off real air traffic presence during activities | ||
| + | :* LOCAL AIR TRAFFIC: Turn on/off local air traffic presence during activities | ||
| − | + | <!--T:77--> | |
| − | : | + | ; SOUND |
| − | + | :* MASTER SOUND: Set overall sound volume | |
| − | ; | + | :* AIRCRAFT: Set Aircraft Volume |
| − | :* | + | :* EGPWS WARNING: Set volume of EGPWS warnings |
| − | :* | + | :* PILOT MONITORING VOICE: Select pilot monitoring voice |
| − | :* | + | :* ATC COMMS: Set volume of pilot monitoring voice and ATC Radio comms |
| − | :* | + | :* ATC OTHER COMMS: Set volume of other pilots and ATC Radio comms |
| − | :* | ||
| − | |||
| − | :* | ||
| − | |||
| − | ; | + | <!--T:78--> |
| − | :* | + | ; ACCOUNT |
| − | :* | + | :* SUPPORT: Opens your mail client ready to send a support email |
| − | :* | + | :* PRIVACY POLICY: Check our privacy policy |
| − | :* | + | :* GOOGLE: Login using your Google account |
| − | :* | + | :* FACEBOOK: Login using your Facebook account |
| − | + | :* ID: Your account ID | |
| − | + | :* PLAYER'S NAME: The name will be visible to other players. Choose carefully your name, you will be able to change it only once | |
| − | + | :* PLAYER'S CALLSIGN: Callsign is used for ATC COMMS and to identify your airplane in multiplayer. Callsign must be 4-6 alphanumeric characters | |
| − | |||
| − | |||
| − | |||
| − | + | <!--T:79--> | |
| − | + | ; FAILURES: All failures are global and apply to all airplanes. | |
| − | + | :* CUSTOM/RANDOM/OFF: Choose your failures, get surprised by random failures or switch them off | |
| − | |||
| − | |||
| − | |||
| − | |||
| − | |||
| − | |||
| − | |||
| − | |||
| − | |||
| − | |||
| − | |||
| − | |||
| − | |||
| − | |||
| − | |||
| − | |||
| − | |||
| − | |||
| − | |||
| − | |||
| − | |||
| − | ; | ||
| − | :* | ||
:* Move the failure list up/down to scroll it and see all available failures | :* Move the failure list up/down to scroll it and see all available failures | ||
:* Move the slider of each failure to set it at the desired frequency or move it all the way to the left to switch it off | :* Move the slider of each failure to set it at the desired frequency or move it all the way to the left to switch it off | ||
| − | + | ||
| − | + | <!--T:80--> | |
| − | :* | + | ; CONTROLS |
| − | :* | + | :* SENSITIVITY: Set your control sensitivity, the lower the sensitivity, the smoother the response of the airplane to your movements |
| − | :* | + | :* INPUT TYPE: Choose your device accelerometer or a virtual joystick. Virtual joystick can be activated in any free part of the screen excluding the HUD area |
| − | :* | + | :* INVERT VERTICAL AXIS: Switch to normal or inverted virtual joystick's vertical axis |
| − | ; | + | |
| − | ; | + | <!--T:158--> |
| − | + | ; PILOTS | |
| − | == | + | Scroll the first option to choose the gender of your pilot and co-pilot. Scroll the second option to choose the face. |
| + | :* CUSTOMIZE: Allows you to apply a customized face to your pilot by uploading a .png or .jpg image. | ||
| + | :* VOICE: Allows you to change the voice of your copilot. | ||
| + | |||
| + | <!--T:159--> | ||
| + | <div id="6_Log_Book" style="display:inline;"></div> | ||
| + | |||
| + | ===5.3 LOGBOOK=== <!--T:81--> | ||
| + | ; For each activity | ||
| + | :* REAL DATE: the real calendar date in which the activity has been performed | ||
| + | :* ACTIVITY DATE: the activity date as set by the flight plan | ||
| + | :* AIRCRAFT: the airplane used to fly | ||
| + | :* FROM: Departure airport | ||
| + | :* TO: Arrival airport | ||
| + | :* DURATION: Flight time | ||
| + | :* TOTAL TIME: Total duration of all flights | ||
| + | |||
| + | <div id="5.4_Game_Manual" style="display:inline;"></div> | ||
| + | ===5.4 GAME MANUAL=== <!--T:82--> | ||
| + | Press this button to access this manual. | ||
| + | |||
| + | <div id="5.5_Release_Note" style="display:inline;"></div> | ||
| + | ===5.5 RELEASE NOTE=== <!--T:83--> | ||
| + | Press this button to read the latest news on the game. Read Release Note [[RFS Release Note|Android]], [[RFS Release Note iOS|iOS]]. | ||
| + | |||
| + | ===5.6 ONLINE STATUS=== <!--T:84--> | ||
| + | <div id="5.6_Online_Status" style="display:inline;"></div> | ||
| + | View your online status. | ||
| + | |||
| + | <div id="10_Subscription" style="display:inline;"></div> | ||
| + | ==6 SUBSCRIPTION== <!--T:85--> | ||
| + | Real Flight Simulator offers different subscriptions to access all game features.<br/> | ||
| + | Please see the comparison table below: | ||
| + | |||
| + | <!--T:86--> | ||
| + | {| class="wikitable" | ||
| + | |- | ||
| + | || | ||
| + | ||RFS | ||
| + | ||RFS PRO | ||
| + | |- | ||
| + | ||AIRCRAFT<br/>HD, Custom liveries, 3D cockpit,<br/>working parts, lights | ||
| + | ||Saab 340<br/>Bombardier CRJ900<br/>Airbus A320-200 | ||
| + | ||All RFS airplanes +<br/>AIRBUS A321neo<br/>AIRBUS A330-300<br/>AIRBUS A340-200<br/>AIRBUS A350-900<br/>AIRBUS A380-800<br/>ATR 72-600<br/>BAE SYSTEMS 146<br/>BOEING 737-800<br/>BOEING 737-800BCF<br/>BOEING 747-200B<br/>BOEING 747-400<br/>BOEING 767-300<br/>BOEING 767-300F<br/>BOEING 777-200<br/>BOEING 787-8 DREAMLINER<br/>CESSNA 172<br/>CONCORDE<br/>EMBRAER E190<br/>MCDONNELL DOUGLAS MD-11<br/>MCDONNELL DOUGLAS MD-11F<br/>TUPOLEV TU-154M<br/>… more coming soon | ||
| + | |- | ||
| + | ||HD AIRPORTS | ||
| + | ||35 Airports with High res<br/>satellite imagery, lifelike 3D <br/>buildings, taxiways and<br/>detailed procedures<br/>(departure, arrival, approach) | ||
| + | ||All RFS HD AIRPORTS +<br/> Ground and Air traffic | ||
| + | |- | ||
| + | ||SD AIRPORTS | ||
| + | ||500 Airports with Runways,<br/> 3D buildings and procedures<br/>(departure and approach) | ||
| + | ||All RFS SD AIRPORTS +<br/>Local Air traffic | ||
| + | |- | ||
| + | ||LD AIRPORTS | ||
| + | ||No | ||
| + | ||14000 Airports with<br/>Runways and procedures<br/>(departure and approach) +<br/>Local Air traffic | ||
| + | |- | ||
| + | ||MULTIPLAYER | ||
| + | ||No | ||
| + | ||Realtime multiplayer,<br/>fly together with pilots from<br/>all over the world. | ||
| + | |- | ||
| + | ||ATC - Air Traffic Control | ||
| + | ||No | ||
| + | ||Interactive multi voice ATC<br/>procedures and communications | ||
| + | |- | ||
| + | ||REAL TIME TRAFFIC | ||
| + | ||No | ||
| + | ||Real time traffic for the 35<br/>largest airports in the world<br/>and their connected<br/>destinations | ||
| + | |- | ||
| + | ||FLY REAL TIME FLIGHTS | ||
| + | ||No | ||
| + | ||Jump on any available real<br/>time flight and bring it<br/>to destination (or wherever you<br/>want…) | ||
| + | |- | ||
| + | ||ADVANCED FLIGHT PLANNER | ||
| + | ||No | ||
| + | ||Advanced Flight Plan with<br/>multiple options to<br/>create / edit / duplicate<br/>complex flight plans | ||
| + | |- | ||
| + | ||SATELLITE TERRAINS | ||
| + | ||No | ||
| + | ||High definition worldwide<br/>satellite terrains (requires<br/>online connection to stream<br/>data) | ||
| + | |- | ||
| + | ||SATELLITE HEIGHTMAPS | ||
| + | ||No | ||
| + | ||High definition worldwide<br/>heightmaps (requires online<br/>connection to stream data) | ||
| + | |} | ||
| + | |||
| + | <div id="7_Chat" style="display:inline;"></div> | ||
| + | ==7 CHAT == <!--T:87--> | ||
| + | Keep the chat list pressed to activate abuse reporting, scroll on the desired highlighted player/phrase, then release to report the user. | ||
| + | Press on a single player name to address him directly and keep track of your conversation (tap outside to deselect it). | ||
| + | |||
| + | <div id="8_Flight_User_Interface" style="display:inline;"></div> | ||
| + | ==8 IN FLIGHT USER INTERFACE == <!--T:88--> | ||
| + | |||
| + | <!--T:89--> | ||
[[File:RFS UI.png|700px|none|baseline|thumb]] | [[File:RFS UI.png|700px|none|baseline|thumb]] | ||
| − | #[[#anchor1| | + | #[[#anchor1|A/P - AUTO PILOT]] |
| − | #[[#anchor2| | + | #[[#anchor2|THR - THROTTLE]] |
| − | #[[#anchor3| | + | #[[#anchor3|MASTER CAUTION]] |
| − | #[[#anchor4| | + | #[[#anchor4|GROUND SYSTEMS]] |
| − | #[[#anchor5| | + | #[[#anchor5|AIRCRAFT SYSTEMS]] |
| − | #[[# | + | #[[#anchor6|FLAPS]] |
| − | #[[# | + | #[[#anchor7|GEAR - LANDING GEAR]] |
| − | #[[# | + | #[[#anchor8|SPOILER]] |
| − | #[[# | + | #[[#anchor9|BRAKE - GROUND BRAKE]] |
| − | #[[# | + | #[[#anchor10|RUD - RUDDER]] |
| − | #[[# | + | #[[#anchor11|Change PANEL INSTRUMENTS]] |
| − | #[[# | + | #[[#anchor12|Change CAMERA]] |
| − | #[[#anchor13|Custom | + | #[[#anchor13|Custom PANEL INDICATORS]] |
| − | #[[# | + | #[[#anchor14|Planner MAP/FMC]] |
| − | #[[# | + | #[[#anchor15|PAUSE]] |
| + | #[[#anchor16|COMMS - COMMUNICATIONS]] | ||
| + | #[[#anchor17|VDGS - VISUAL DOCKING GUIDANCE SYSTEM]] | ||
| + | #[[#anchor18|CAMERA SETTINGS]] | ||
| + | <br/> | ||
| + | <!--T:90--> | ||
---- | ---- | ||
| − | <div id="anchor1">'''1. | + | <!--T:91--> |
| + | <div id="anchor1">'''1. A/P - AUTO PILOT'''</div> | ||
'''[[File:AP.png|400px|none|middle|thumb]]''' | '''[[File:AP.png|400px|none|middle|thumb]]''' | ||
| − | '''A/P''' - Tap | + | <!--T:92--> |
| − | '''NAV''' - Activates auto pilot. When | + | '''A/P''' - AUTO PILOT: Tap to open/close the auto pilot panel.<br/> |
| − | '''APP''' - Activates auto approach. Available only when airplane is within ILS range. | + | '''NAV''' - NAVIGATION: Activates auto pilot navigation. The aircraft follows the flight plan. When NAVIGATION is active, Speed, Heading and Altitude cannot be changed manually..<br/> |
| − | '''SPD''' - Keep the button pressed and move up/down to | + | '''APP''' - APPROACH: Activates auto approach. Available only when airplane is within ILS range.<br/> |
| − | '''HDG''' - Keep the button pressed and move up/down to | + | '''SPD''' - SPEED: Keep the button pressed and move up/down to set the speed.<br/> |
| − | '''ALT''' - Keep the button pressed and move up/down to | + | '''HDG''' - HEADING: Keep the button pressed and move up/down to set the heading.<br/> |
| − | '''VS''' - Keep the button pressed and move up/down to | + | '''ALT''' - ALTITUDE: Keep the button pressed and move up/down to set the altitude.<br/> |
| + | '''VS''' - VERTICAL SPEED: Keep the button pressed and move up/down to set the vertical speed. | ||
<br /> | <br /> | ||
<br /> | <br /> | ||
| − | <div id="anchor2">'''2. | + | <div id="anchor2">'''2. THR - THROTTLE''': Move up/down to set desired engine thrust.</div><br/> |
| − | <div id="anchor3">'''3. | + | <div id="anchor3">'''3. MASTER CAUTION''': Shows any active alarm. Tap to reset alarms.</div><br/> |
| − | |||
| − | ''' | + | <!--T:93--> |
| + | <div id="anchor4">'''4. GROUND SYSTEMS'''</div> | ||
; | ; | ||
| − | :Tap | + | :Available only when on ground. |
| − | :Keep the button pressed and move up/down to | + | :Tap to open/close the currently selected sub-menu. |
| + | :Keep the button pressed and move up/down to select a different sub-menu (SYSTEMS, LOAD, EMERGENCY, EXTERIOR INSPECTION).<br/> | ||
| + | <br/> | ||
| + | :'''4.1 SYSTEMS''' | ||
| + | :[[File:RFS Manual Ground Systems.png|400px|none|middle|thumb]] | ||
| + | : | ||
| + | :'''GROUND POWER UNIT''' - External power supply. Tap once to activate/deactivate external power supply service. | ||
| + | : | ||
| + | :'''ACU''' - External Air Conditioning Unit | ||
: | : | ||
| + | :'''PUSHBACK''' - Available only when stationary, activate it to be pushed back. | ||
| + | : | ||
| + | <br/> | ||
| + | :'''4.2 LOAD''' | ||
| + | :[[File:RFS Manual Ground Systems Load.png|400px|none|middle|thumb]] | ||
| + | : | ||
| + | :'''PAX DOOR''' - Tap once to activate/deactivate passenger service. Tap on PAX and select desired quantity, release to start board/disembark. | ||
| + | : | ||
| + | :'''CARGO DOOR''' - Tap once to activate/deactivate cargo service. Tap on CARGO and select desired quantity, release to start load/unload. | ||
| + | : | ||
| + | :'''FUEL TRUCK''' - Tap once to activate/deactivate fuel service. Tap on FUEL and select desired quantity, release to start load/unload. | ||
| + | : | ||
| + | <br/> | ||
| + | :All ground services are always available but passenger boarding bridge and vehicles are only available when your aircraft is properly positioned at the gate in HD airports. | ||
| + | <br/> | ||
| + | :'''4.3 EMERGENCY''' | ||
| + | :[[File:RFS Manual Emergency.png|400px|none|middle|thumb]] | ||
| + | : | ||
| + | :'''EVACUATION SLIDE''' - Tap once to activate evacuation slide. | ||
| + | : | ||
| + | :'''AMBULANCE''' - Tap once to activate/deactivate medical emergency. | ||
| + | : | ||
| + | :'''FIREFIGHTING VEHICLE''' - Tap once to activate/deactivate fire emergency. Tap on EXTINGUISHER to deliver extinguishing agents. | ||
| + | : | ||
| + | <br/> | ||
| + | '''4.4 EXTERIOR INSPECTION''' | ||
| + | [[File:RFS_Manual_Ground_Check.png|400px|none|middle|thumb]] | ||
| + | Tap on EXTERIOR INSPECTION to open ground check inspection view. | ||
| + | |||
| + | <!--T:151--> | ||
| + | [[File:RFS_Manual_Ground_Check_Exterior.png|400px|none|middle|thumb]] | ||
| + | |||
| + | <!--T:152--> | ||
| + | Use virtual joysticks to inspect aircraft. Tap on EXTERIOR INSPECT. to open/close the checklist panel. Tap on EXIT to return to the aircraft. | ||
| + | |||
| + | <!--T:153--> | ||
| + | Tap to open/close the checklist panel | ||
| + | |||
| + | :CHECKLIST panel: | ||
| + | :PREV - Go to previous checklist | ||
| + | :CLEAR - Delete current list | ||
| + | :NEXT - Go to next checklist | ||
| + | :CLOSE - Close the checklist | ||
| + | <br /> | ||
| + | |||
| + | <!--T:154--> | ||
| + | '''5. AIRCRAFT SYSTEMS''' | ||
| + | ; | ||
| + | :Tap to open/close the currently selected sub-menu. | ||
| + | :Keep the button pressed and move up/down to select a different sub-menu (SYSTEMS, ENGINES, LIGHTS, FUEL, CHECKLIST).<br/> | ||
| + | <br/> | ||
:<div id="anchor5">'''5.1 SYSTEMS'''</div> | :<div id="anchor5">'''5.1 SYSTEMS'''</div> | ||
:[[File:SYSTEM01.png|400px|none|middle|thumb]] | :[[File:SYSTEM01.png|400px|none|middle|thumb]] | ||
| − | + | : | |
| − | + | :'''HUD''' - switch HUD on/off | |
| − | + | : | |
| − | + | :'''WP HUD''' - switch WayPoints labels on/off | |
| − | + | : | |
| − | + | :'''AC HUD''' - switch other AirCraft labels on/off | |
| − | + | : | |
| − | + | :'''COMMS HUD''' - switch COMMS text on/off | |
| − | + | : | |
| − | + | :'''APU''' - AUXILIARY POWER UNIT: switch APU on/off | |
| − | + | : | |
| − | + | :'''ICE''' - switch deicing on/off | |
| − | + | : | |
| − | + | :'''SEAT BELTS''' - switch seat belts advise on/off | |
| − | + | : | |
| − | + | :'''NO SMOKING''' - switch no smoking advise on/off | |
| − | + | : | |
| − | + | :'''WIPERS''' - switch wipers ON/OFF | |
| − | : | + | : |
| + | <br/> | ||
:'''5.2 ENGINES''' | :'''5.2 ENGINES''' | ||
:[[File:ENGINES01.png|400px|none|middle|thumb]] | :[[File:ENGINES01.png|400px|none|middle|thumb]] | ||
| − | + | : | |
| − | + | :For each engine: | |
| − | + | : | |
| − | + | :'''FIRE''' - Tap once to activate, tap again when ready to use extinguisher, will deactivate automatically after a few seconds if not used. | |
| − | + | : | |
| − | + | :'''ENG x N1 xx%''' - Tap once to start up the engine, ready when green; tap again to switch it off. Displays N1 (Low pressure compressor rotational speed) for each engine. | |
| − | + | : | |
| − | + | :'''THR xx%''' - Move up/down to adjust engines thrust separately. | |
| − | :: | + | : |
| − | :'''5. | + | <br/> |
| + | :'''5.3 LIGHTS''' | ||
| + | :[[File:LIGHTS.png|400px|none|middle|thumb]] | ||
| + | : | ||
| + | :'''COCKPIT LIGHTS''' - keep the button pressed and move up/down to set cockpit lights | ||
| + | : | ||
| + | :'''NAV LIGHTS''' - switch navigation lights on/off | ||
| + | : | ||
| + | :'''LANDING LIGHTS''' - switch landing lights on/off | ||
| + | : | ||
| + | :'''TAXI LIGHTS''' - switch taxi lights on/off | ||
| + | : | ||
| + | :'''CABIN LIGHTS''' - keep the button pressed and move up/down to set cabin lights | ||
| + | : | ||
| + | :'''BEACON LIGHTS''' - switch beacon lights on/off | ||
| + | : | ||
| + | :'''STROBE LIGHTS''' - switch strobe lights on/off | ||
| + | : | ||
| + | :'''LOGO LIGHTS''' - switch logo lights on/off | ||
| + | : | ||
| + | <br/> | ||
| + | :'''5.4 FUEL''' | ||
:[[File:FUEL01.png|400px|none|middle|thumb]] | :[[File:FUEL01.png|400px|none|middle|thumb]] | ||
| − | + | : | |
| − | + | :'''LEFT TANK''' - Tap to release fuel | |
| − | + | : | |
| − | + | :'''RIGHT TANK''' - Tap to release fuel | |
| − | + | : | |
| − | + | :'''FUEL''' - Move left/right to move fuel from one tank to the other | |
| + | <br/> | ||
| + | |||
| + | <!--T:150--> | ||
| + | :'''5.5 CHECKLIST''' | ||
| + | :[[File:CHECKLIST01.png|400px|none|middle|thumb]] | ||
| + | :Tap to open/close the checklist panel | ||
| + | :[[File:CHECKLIST02.png|600px|none|middle|thumb]] | ||
| + | : | ||
| + | :CHECKLIST panel: | ||
| + | :'''PREV''' - Go to previous checklist | ||
| + | :'''CLEAR''' - Delete current list | ||
| + | :'''NEXT''' - Go to next checklist | ||
| + | :'''CLOSE''' - Close the checklist | ||
| + | <br/> | ||
| + | <!--T:109--> | ||
<div id="anchor6">'''6. FLAPS'''</div> | <div id="anchor6">'''6. FLAPS'''</div> | ||
[[File:FLAP.png|400px|none|middle|thumb]] | [[File:FLAP.png|400px|none|middle|thumb]] | ||
| − | Keep the button pressed and move up/down to | + | <!--T:94--> |
| + | Keep the button pressed and move up/down to change flaps settings. | ||
| + | <br/> | ||
| + | <div id="anchor7">'''7. GEAR - LANDING GEAR'''</div> | ||
| + | Press to extend/retract the landing gear. Make sure to have an IAS (Indicated Airspeed) below "VLO" (Maximum landing gear operating speed) in order to extend it. | ||
| + | <br/> | ||
| + | <div id="anchor8">'''8. SPOILER'''</div> | ||
| + | [[File:SPOILER01.png|400px|none|middle|thumb]] | ||
| − | <div id=" | + | <!--T:95--> |
| − | ---- | + | Keep the button pressed and move up/down to change spoilers settings. |
| + | <br/> | ||
| + | <div id="anchor9">'''9. BRAKE - GROUND BRAKE'''</div> | ||
| + | Tap to switch on/off the ground brake. | ||
| + | <br/> | ||
| + | <div id="anchor10">'''10. RUD - RUDDER'''</div> | ||
| + | Move left/right to operate the rudder. | ||
| + | <br/> | ||
| + | <div id="anchor11">'''11. Change PANEL INSTRUMENTS'''</div> | ||
| + | Tap to switch multiple panel configuration.<br/> | ||
| + | Keep the button pressed and move up/down to quickly change the panel.<br/> | ||
| + | Press and hold on a single instrument for 1 second and move up/down/left/right to customize it. | ||
| + | <br/> | ||
| + | <div id="anchor12">'''12. Change CAMERA'''</div> | ||
| + | Tap to switch multiple camera views.<br/> | ||
| + | Keep the button pressed and move up/down/left/right to quickly choose the desired camera view.<br/> | ||
| + | <br/> | ||
| + | <div id="anchor13">'''13. Custom PANEL INDICATORS'''</div> | ||
| + | [[File:CustomDataLabels.png|400px|none|middle|thumb]] | ||
| + | Keep the indicator pressed and move up/down/left/right to change the indicator type.<br/> | ||
| + | <br/> | ||
| + | <div id="anchor14">'''14. Flight Plan MAP/FMC'''</div> | ||
| + | <gallery widths="400px" heights="300px" perrow="2"> | ||
| + | File:Planner.png|Planner| | ||
| + | File:PlannerFlight.png|PlannerFlight| | ||
| + | </gallery> | ||
| + | '''FMC'''- Flight Management Computer: Open/close FMC panel.<br/> | ||
| + | '''CENTER'''- Center the map view on your airplane.<br/> | ||
| + | <br/> | ||
| + | Once a waypoint has been selected, press:<br/> | ||
| + | "'''+'''" to add a new waypoint to your flight plan. It will be automatically added below the selected waypoint on the flight plan. If you have not selected anything from the flight plan, this waypoint will be added to the bottom of the list.<br/> | ||
| + | "'''Đ'''" (Direct to) icon to delete the entire flight plan and go directly to the selected waypoint.<br/><br/> | ||
| + | |||
| + | <!--T:96--> | ||
| + | '''FMC panel:'''<br/> | ||
| + | |||
| + | <!--T:97--> | ||
| + | '''RMV''' - REMOVE: Select a waypoint from the list and press RMV to remove it.<br/> | ||
| + | '''NXT''' - NEXT: Select a waypoint from the list and press NXT to make it the next active waypoint.<br/> | ||
| + | '''UP''' - UP: Select a waypoint from the list and press UP to move it to the up in the list.<br/> | ||
| + | '''DWN''' - DOWN: Select a waypoint from the list and press DOWN to move it to down in the list.<br/> | ||
| + | '''CLR''' - CLEAR: Clear all waypoints.<br/> | ||
| + | '''DEP''' - DEPARTURE: Only departure on HD airport. Press DEP to open the SID list, then choose a SID and press SELECT to activate it.<br/> | ||
| + | '''ARR''' - ARRIVAL: Only arrival on HD airport. Press ARR to open the STAR list, then choose a STAR and press SELECT to activate it.<br/> | ||
| + | '''APP''' - APPROACH: Active only if an arrival airport exists in your flight plan. Press APP to open the APPROACH list, then choose an APPROACH and press SELECT, then choose the TRANSITION (only HD airport) and press SELECT to activate it.<br/> | ||
| + | |||
| + | <!--T:98--> | ||
| + | <div id="anchor15">'''15. PAUSE'''</div> | ||
| + | :; '''TAKEOFF / LANDING''' | ||
| + | :[[File:TakeOffLanding.png|700px|none|middle|thumb]] | ||
| + | :Choose any of the options available to quickly perform an activity<br/><br/> | ||
| + | :; '''DATE / TIME''' | ||
| + | :[[File:GamePause 02.jpeg|700px|none|middle|thumb]] | ||
| + | :* CUSTOM/REAL: Choose real time or customize any setting | ||
| + | :* DATE: Tap on the date to change it | ||
| + | :* TIME: Move the slider to change it<br/><br/> | ||
| + | :; '''AIRCRAFT''' | ||
| + | :[[File:GamePause 03.png|700px|none|middle|thumb]] | ||
| + | :* FUEL: Move the slider to change quantity | ||
| + | :* PASSENGERS: Move the slider to change quantity | ||
| + | :* CARGO: Move the slider to change quantity<br/><br/> | ||
| + | :; '''WEATHER''': Sets your current weather | ||
| + | :[[File:GamePause 04.png|700px|none|middle|thumb]] | ||
| + | :* CUSTOM: move sliders to change weather settings | ||
| + | :* REAL: real weather conditions<br/><br/> | ||
| + | :; '''FAILURES''': All failures are global and apply to all airplanes. | ||
| + | :[[File:GamePause 05.png|700px|none|middle|thumb]] | ||
| + | :* CUSTOM/RANDOM/OFF: Choose your failures, get surprised by random failures or switch them off | ||
| + | :* Move the failure list up/down to scroll it and see all available failures | ||
| + | :* Move the slider of each failure to set it at the desired frequency or move it all the way to the left to switch it off<br/><br/> | ||
| + | :; '''CONTROLS''' | ||
| + | :[[File:GamePause 06.png|700px|none|middle|thumb]] | ||
| + | :* SENSITIVITY: Set your control sensitivity, the lower the sensitivity, the smoother the response of the airplane to your movements | ||
| + | :* INPUT TYPE: Choose your device accelerometer or a virtual joystick. Virtual joystick can be activated in any free part of the screen excluding the HUD area | ||
| + | :* INVERT VERTICAL AXIS: Switch to normal or inverted virtual joystick's vertical axis<br/><br/> | ||
| + | :; '''CALIBRATE''': Tap to calibrate and return to your flight<br/><br/> | ||
| + | :; '''CONTINUE''': Return to your flight<br/><br/> | ||
| + | :; '''EXIT'''- Leave the flight | ||
| + | :[[File:GamePause 07.png|700px|none|middle|thumb]] | ||
| + | : If you Exit you will have access to: | ||
| + | :* EXIT: Back to main menu | ||
| + | :* TRY AGAIN: Restart your flight | ||
| + | :* REWIND: Return to your flight as it was one minute before exiting/crashing | ||
| + | :* REPORT: End of flight report. Will also appear when switching engines off or after connecting PBB (Passenger Boarding Bridge) and switching engines off | ||
| + | :* REPLAY: Look at your replay<br/><br/> | ||
| + | |||
| + | <!--T:99--> | ||
| + | <div id="anchor16">'''16. COMMS - COMMUNICATIONS'''</div> | ||
| + | |||
| + | <!--T:100--> | ||
| + | :'''16.1 ATC - Air Traffic Control'''<br/> | ||
| + | :[[File:RFS Manual ATC 2.png|400px|none|middle|thumb]] | ||
| + | :ATC will allow you to manage communications between your aircraft and different air traffic controllers. | ||
| + | :Start by choosing the correct frequencies according to where you are located, then choose actions according to flight procedures. You will also listen to any communication between ATC and other aircraft tuned on the same frequency.<br/> | ||
| + | : | ||
| + | :'''ATIS''' - Automatic terminal information service. Reports a continuous broadcast of recorded aeronautical information.<br/> | ||
| + | : | ||
| + | :'''GROUND''' - Used while on the ground.<br/> | ||
| + | : | ||
| + | :'''TOWER''' - Used while on the runway, takeoff and final landing.<br/> | ||
| + | : | ||
| + | :'''APPROACH''' - Used after takeoff and during initial landing.<br/> | ||
| + | : | ||
| + | :'''EN ROUTE''' - Used during flight.<br/> | ||
| + | : | ||
| + | :'''EMERGENCY''' - Used to manage any aircraft emergency procedure.<br/> | ||
| + | :- REQUEST NEAREST AIRPORT: make a request for the nearest airport.<br/> | ||
| + | :- SET PLAN TO NEAREST: set your flight plan to the nearest airport.<br/> | ||
| + | :- EMERGENCY/URGENCY: to report current situation.<br/> | ||
| + | :<br/> | ||
| + | :'''16.2 PASSENGERS ANNOUNCEMENTS'''<br/> | ||
| + | :[[File:RFS Manual PAX.png|400px|none|middle|thumb]] | ||
| + | :'''PAX ANNOUNC.''' will allow you to manage communications of the pilot and crew to your passengers.<br/> | ||
| + | : | ||
| + | :'''PILOT''' – All pilot related communications.<br/> | ||
| + | :'''CREW''' - All crew related communications.<br/> | ||
| + | :<br/> | ||
| + | |||
| + | <!--T:106--> | ||
| + | :'''16.3 IN FLIGHT CHAT'''<br/> | ||
| + | : <gallery widths="400px" heights="203px" perrow="2"> | ||
| + | : File:RFS Manual COMMS CHAT MAIN.png|MAIN CHAT the same chat as the one in the main menu available to all players. Tap on the top left button to change language. | ||
| + | : File:RFS Manual COMMS CHAT MULTIPLAYER.png|MULTIPLAYER CHAT named after the server you have chosen in multiplayer. Tap on the top right button to filter pilots by distance. | ||
| + | : </gallery><br/> | ||
| − | <div id=" | + | <!--T:101--> |
| − | + | <div id="anchor17">'''17. VDGS - VISUAL DOCKING GUIDANCE SYSTEM'''</div> | |
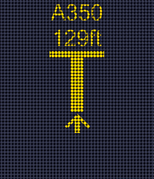
| + | Available on any HD Airport. Follow map instructions to reach your assigned gate, then reach the parking area following instructions provided by the VDGS. When correctly parked (OK), the PASSENGER BOARDING BRIDGE will become available.<br/> | ||
| + | <gallery widths="154px" heights="180px" perrow="4"> | ||
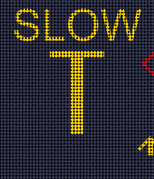
| + | File:RFS_Manual_RIGHT-ARROW.png|Aircraft not aligned, move to the left|Aircraft not aligned, move to the left | ||
| + | File:RFS_Manual_FEETS.png|Aircraft correctly aligned, distance in feet to target area|Aircraft correctly aligned, distance in feet to target area | ||
| + | File:RFS_Manual_STOP.png|Target area reached, stop aircraft here|Target area reached, stop aircraft here | ||
| + | File:RFS_Manual_TOO-FAR.png|Target area overpassed, move back|Target area overpassed, move back | ||
| + | </gallery> | ||
| − | + | <!--T:155--> | |
| + | <div id="anchor18">'''18. CAMERA SETTINGS'''</div> | ||
| + | If enabled, tap to open camera settings | ||
| + | For cockpit cameras: | ||
| + | [[File:MonitorsMenu.png|400px|none|middle|thumb]] | ||
| − | < | + | <!--T:156--> |
| − | + | Press and drag on the buttons:<br/> | |
| − | + | '''VERT.''' To adjust camera position<br/> | |
| − | + | '''ANGLE''' To adjust the camera angle<br/> | |
| − | + | Press '''RESET''' to reset the position<br/> | |
| − | + | Press on monitor name to cycle between monitors<br/> | |
| − | < | + | Press and hold on individual monitor name for one second and move up/down/right/left to select monitor.<br/> |
| − | + | If the monitor supports it, you can access its custom settings.<br/> | |
| − | + | '''NAV''' and '''WEATHER''' have '''RANGE''' functionality to change zoom level | |
| − | |||
| − | <div id=" | + | <!--T:157--> |
| − | + | <div id="12_Aircraft" style="display:inline;"></div> | |
| − | < | + | ==9 AIRCRAFT AND LIVERIES== <!--T:102--> |
| − | + | <gallery widths="450px" heights="337px" perrow="3"> | |
| + | File:NewMenuAircraft.png|Aircraft menu | ||
| + | File:NewMenuLivery.png|Liveries menu | ||
| + | </gallery> | ||
| − | Choose | + | <!--T:158--> |
| − | + | Choose an airplane from the list on the left. You can add planes and liveries to your favorites by selecting the star icon close to their name.<br/> | |
| + | Change livery by tapping on the arrows at the sides of the livery name or tap on the "Liveries" tab to open the complete list. | ||
| + | * CONFIRM: Proceed to route selection | ||
| + | * BACK: Back to main menu | ||
| + | * CREATE LIVERY: Proceed to web page [http://www.realflightsimulator.org/liveries RFS Liveries] to download livery templates (needs graphical package supporting .psd file format). Tutorial video instructions: https://youtu.be/FmwjD-TCS4E<br/> | ||
| − | + | </translate> | |
| − | |||
| − | + | <languages /> | |
| − | |||
| − | |||
Latest revision as of 07:04, 12 July 2024
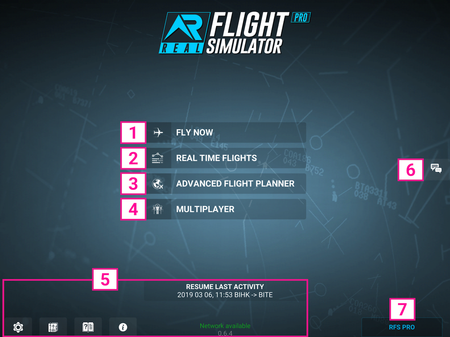
Welcome to the official user manual for Real Flight Simulator.
Tutorial videos: www.youtube.com/RORTOS
Main menu
In flight user interface

Aircraft and liveries


Contents
1 FLY NOW
Quickly enter the flight simulator
1.1 Plane selection
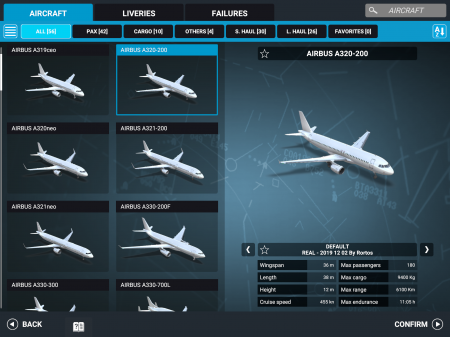
Aircraft menu
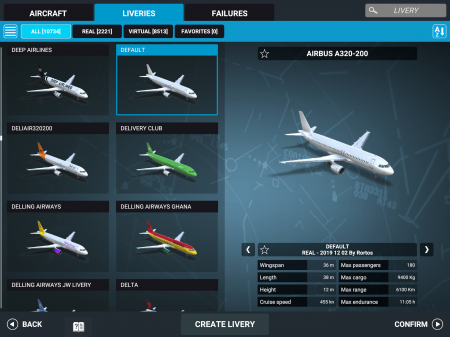
Liveries menu


Choose an airplane from the list on the left. You can add planes and liveries to your favorites by selecting the star icon close to their name.
Change livery by tapping on the arrows at the sides of the livery name or tap on the "Liveries" tab to open the complete list.
- CONFIRM: Proceed to route selection
- BACK: Back to main menu
- CREATE LIVERY: Proceed to web page RFS Liveries to download livery templates (needs graphical package supporting .psd file format). Tutorial video instructions: https://youtu.be/FmwjD-TCS4E

Zoom in or out by pinching the map, smaller airports appear by zooming in more.
Select an airport on the map by tapping on its ICAO code or search it using the ICAO Search button.
Choose takeoff or landing by tapping on the icon to the right of the airport name, tap again to cancel it.
Airports types:
HD Airport
SD Airport
LD Airport


HD Airport - Selection
No selection
Start from RUNWAY
Start from GATE


SD/LD Airport - Selection
Start from runway
Land on runway (Taxi to gate if HD Airport)


- START FLIGHT: Take control of the airplane
- RESET: Clear airport selection
- BACK: Back to airplane selection
2 REAL TIME FLIGHTS
Search for real flights and fly them.
Zoom in or out by pinching the map.
Search for an aircraft using the search bar by entering the aircraft type or flight ID.
Click on any aircraft on the map to display the flight information.

- CONFIRM: Go to the aircraft page and select the aircraft livery, then proceed to START FLIGHT
- BACK: Back to main menu
3 ADVANCED FLIGHT PLANNER
Plan carefully your flight plan and execute it.

3.1 File selection
Choose an existing plan from the list on the left or choose an option from the top bar.
- NEW: Create a new flight plan
- DUPLICATE: Create a copy of the selected flight plan
- EDIT: Edit selected flight plan
- DELETE: Delete selected flight plan
- START FLIGHT: Start the selected flight plan
- BACK: Back to main menu
3.2 Edit/New

- GENERAL
- TITLE: Insert the title of your flight plan
- DESCRIPTION: Insert the description of your flight plan
- TAGS: insert any tags of your flight plan separated by a space (example: “Asia Rain Singapore”)
- DATE/TIME
- CUSTOM/REAL: Choose real time or customize any setting
- DATE: Tap on the date to change it
- TIME: Move the slider to change it
- FLIGHT PLAN
- See your planned route. Tap on EDIT to create/change your route
-
- Select departure and arrival airports
- Choose DEPARTURE to set the SID procedure (HD airports includes Transitions)
- Choose ARRIVAL to set the STAR procedure (only HD airports)
- Choose APPROACH to set the landing runway
- Choose ADD LEG to add a new leg up to a maximum of 5
- Choose REMOVE LEG to remove a leg
- Tap on any leg to edit the flight plan for that leg
- BACK: to ignore changes
- CONFIRM: to set your flight plan
- AIRCRAFT: View the airplane you have selected
- CHANGE: change your airplane
- FUEL: Move the slider to change quantity
- PASSENGERS: Move the slider to change quantity
- CARGO: Move the slider to change quantity
- METAR: Sets your weather
- CUSTOM: move sliders to change weather settings
- REAL: real weather conditions
- RANDOM: random weather conditions

4 MULTIPLAYER
Real time Multiplayer

Choose MY PROFILE to manage your stats and rank. Each complete flight with take off and landing will earn you Flight Points (FP).
Choose VIRTUAL AIRLINE to manage your Virtual Airline.
Choose an available server from the list.
Join ATC (Beta) for playing as ATC or Pilot.
Follow this link Basic functions of human-controlled ATC for watching the tutorial.

Zoom in/out to see where other pilots are flying, tap on any airplane to see pilot details.
Set your flight plan and START FLIGHT.

Tap on any airplane to see pilot details.
5 OTHER OPTIONS

5.1 RESUME LAST ACTIVITY
You can use this button to quickly resume your last flight where you left it.
5.2 SETTINGS
- SYSTEM
-
- QUALITY: 3D world detail quality, lower it if you have frame rate or stability problems
- NATIVE RESOLUTION: Activates device native resolution (Only Android devices). May decrease frame rate performance
- IN FLIGHT UI: ON=in game UI always displayed; OFF=in game UI appears only when touching the screen
- CLEAR CACHE: Resets the cache of downloaded data, clear it only when you are having problems with excessive app size or corrupted textures
- SATELLITE TERRAINS: Turn on/off high definition worldwide satellite terrains
- SATELLITE HEIGHTMAPS: Turn on/off high definition worldwide heightmaps
- REAL TIME AIR TRAFFIC: Turn on/off real air traffic presence during activities
- LOCAL AIR TRAFFIC: Turn on/off local air traffic presence during activities
- SOUND
-
- MASTER SOUND: Set overall sound volume
- AIRCRAFT: Set Aircraft Volume
- EGPWS WARNING: Set volume of EGPWS warnings
- PILOT MONITORING VOICE: Select pilot monitoring voice
- ATC COMMS: Set volume of pilot monitoring voice and ATC Radio comms
- ATC OTHER COMMS: Set volume of other pilots and ATC Radio comms
- ACCOUNT
-
- SUPPORT: Opens your mail client ready to send a support email
- PRIVACY POLICY: Check our privacy policy
- GOOGLE: Login using your Google account
- FACEBOOK: Login using your Facebook account
- ID: Your account ID
- PLAYER'S NAME: The name will be visible to other players. Choose carefully your name, you will be able to change it only once
- PLAYER'S CALLSIGN: Callsign is used for ATC COMMS and to identify your airplane in multiplayer. Callsign must be 4-6 alphanumeric characters
- FAILURES
- All failures are global and apply to all airplanes.
- CUSTOM/RANDOM/OFF: Choose your failures, get surprised by random failures or switch them off
- Move the failure list up/down to scroll it and see all available failures
- Move the slider of each failure to set it at the desired frequency or move it all the way to the left to switch it off
- CONTROLS
-
- SENSITIVITY: Set your control sensitivity, the lower the sensitivity, the smoother the response of the airplane to your movements
- INPUT TYPE: Choose your device accelerometer or a virtual joystick. Virtual joystick can be activated in any free part of the screen excluding the HUD area
- INVERT VERTICAL AXIS: Switch to normal or inverted virtual joystick's vertical axis
- PILOTS
Scroll the first option to choose the gender of your pilot and co-pilot. Scroll the second option to choose the face.
- CUSTOMIZE: Allows you to apply a customized face to your pilot by uploading a .png or .jpg image.
- VOICE: Allows you to change the voice of your copilot.
5.3 LOGBOOK
- For each activity
-
- REAL DATE: the real calendar date in which the activity has been performed
- ACTIVITY DATE: the activity date as set by the flight plan
- AIRCRAFT: the airplane used to fly
- FROM: Departure airport
- TO: Arrival airport
- DURATION: Flight time
- TOTAL TIME: Total duration of all flights
5.4 GAME MANUAL
Press this button to access this manual.
5.5 RELEASE NOTE
Press this button to read the latest news on the game. Read Release Note Android, iOS.
5.6 ONLINE STATUS
View your online status.
6 SUBSCRIPTION
Real Flight Simulator offers different subscriptions to access all game features.
Please see the comparison table below:
| RFS | RFS PRO | |
| AIRCRAFT HD, Custom liveries, 3D cockpit, working parts, lights |
Saab 340 Bombardier CRJ900 Airbus A320-200 |
All RFS airplanes + AIRBUS A321neo AIRBUS A330-300 AIRBUS A340-200 AIRBUS A350-900 AIRBUS A380-800 ATR 72-600 BAE SYSTEMS 146 BOEING 737-800 BOEING 737-800BCF BOEING 747-200B BOEING 747-400 BOEING 767-300 BOEING 767-300F BOEING 777-200 BOEING 787-8 DREAMLINER CESSNA 172 CONCORDE EMBRAER E190 MCDONNELL DOUGLAS MD-11 MCDONNELL DOUGLAS MD-11F TUPOLEV TU-154M … more coming soon |
| HD AIRPORTS | 35 Airports with High res satellite imagery, lifelike 3D buildings, taxiways and detailed procedures (departure, arrival, approach) |
All RFS HD AIRPORTS + Ground and Air traffic |
| SD AIRPORTS | 500 Airports with Runways, 3D buildings and procedures (departure and approach) |
All RFS SD AIRPORTS + Local Air traffic |
| LD AIRPORTS | No | 14000 Airports with Runways and procedures (departure and approach) + Local Air traffic |
| MULTIPLAYER | No | Realtime multiplayer, fly together with pilots from all over the world. |
| ATC - Air Traffic Control | No | Interactive multi voice ATC procedures and communications |
| REAL TIME TRAFFIC | No | Real time traffic for the 35 largest airports in the world and their connected destinations |
| FLY REAL TIME FLIGHTS | No | Jump on any available real time flight and bring it to destination (or wherever you want…) |
| ADVANCED FLIGHT PLANNER | No | Advanced Flight Plan with multiple options to create / edit / duplicate complex flight plans |
| SATELLITE TERRAINS | No | High definition worldwide satellite terrains (requires online connection to stream data) |
| SATELLITE HEIGHTMAPS | No | High definition worldwide heightmaps (requires online connection to stream data) |
7 CHAT
Keep the chat list pressed to activate abuse reporting, scroll on the desired highlighted player/phrase, then release to report the user. Press on a single player name to address him directly and keep track of your conversation (tap outside to deselect it).
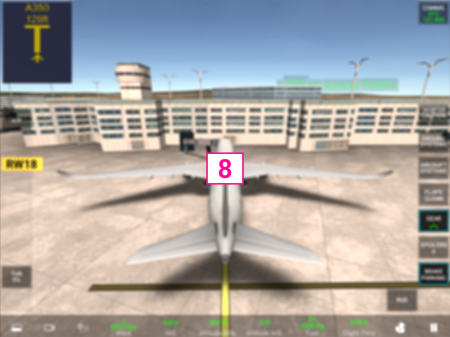
8 IN FLIGHT USER INTERFACE

- A/P - AUTO PILOT
- THR - THROTTLE
- MASTER CAUTION
- GROUND SYSTEMS
- AIRCRAFT SYSTEMS
- FLAPS
- GEAR - LANDING GEAR
- SPOILER
- BRAKE - GROUND BRAKE
- RUD - RUDDER
- Change PANEL INSTRUMENTS
- Change CAMERA
- Custom PANEL INDICATORS
- Planner MAP/FMC
- PAUSE
- COMMS - COMMUNICATIONS
- VDGS - VISUAL DOCKING GUIDANCE SYSTEM
- CAMERA SETTINGS

A/P - AUTO PILOT: Tap to open/close the auto pilot panel.
NAV - NAVIGATION: Activates auto pilot navigation. The aircraft follows the flight plan. When NAVIGATION is active, Speed, Heading and Altitude cannot be changed manually..
APP - APPROACH: Activates auto approach. Available only when airplane is within ILS range.
SPD - SPEED: Keep the button pressed and move up/down to set the speed.
HDG - HEADING: Keep the button pressed and move up/down to set the heading.
ALT - ALTITUDE: Keep the button pressed and move up/down to set the altitude.
VS - VERTICAL SPEED: Keep the button pressed and move up/down to set the vertical speed.
- Available only when on ground.
- Tap to open/close the currently selected sub-menu.
- Keep the button pressed and move up/down to select a different sub-menu (SYSTEMS, LOAD, EMERGENCY, EXTERIOR INSPECTION).
- 4.1 SYSTEMS
- GROUND POWER UNIT - External power supply. Tap once to activate/deactivate external power supply service.
- ACU - External Air Conditioning Unit
- PUSHBACK - Available only when stationary, activate it to be pushed back.

- 4.2 LOAD
- PAX DOOR - Tap once to activate/deactivate passenger service. Tap on PAX and select desired quantity, release to start board/disembark.
- CARGO DOOR - Tap once to activate/deactivate cargo service. Tap on CARGO and select desired quantity, release to start load/unload.
- FUEL TRUCK - Tap once to activate/deactivate fuel service. Tap on FUEL and select desired quantity, release to start load/unload.

- All ground services are always available but passenger boarding bridge and vehicles are only available when your aircraft is properly positioned at the gate in HD airports.
- 4.3 EMERGENCY
- EVACUATION SLIDE - Tap once to activate evacuation slide.
- AMBULANCE - Tap once to activate/deactivate medical emergency.
- FIREFIGHTING VEHICLE - Tap once to activate/deactivate fire emergency. Tap on EXTINGUISHER to deliver extinguishing agents.

4.4 EXTERIOR INSPECTION

Tap on EXTERIOR INSPECTION to open ground check inspection view.

Use virtual joysticks to inspect aircraft. Tap on EXTERIOR INSPECT. to open/close the checklist panel. Tap on EXIT to return to the aircraft.
Tap to open/close the checklist panel
- CHECKLIST panel:
- PREV - Go to previous checklist
- CLEAR - Delete current list
- NEXT - Go to next checklist
- CLOSE - Close the checklist
5. AIRCRAFT SYSTEMS
- Tap to open/close the currently selected sub-menu.
- Keep the button pressed and move up/down to select a different sub-menu (SYSTEMS, ENGINES, LIGHTS, FUEL, CHECKLIST).
- 5.1 SYSTEMS
- HUD - switch HUD on/off
- WP HUD - switch WayPoints labels on/off
- AC HUD - switch other AirCraft labels on/off
- COMMS HUD - switch COMMS text on/off
- APU - AUXILIARY POWER UNIT: switch APU on/off
- ICE - switch deicing on/off
- SEAT BELTS - switch seat belts advise on/off
- NO SMOKING - switch no smoking advise on/off
- WIPERS - switch wipers ON/OFF

- 5.2 ENGINES
- For each engine:
- FIRE - Tap once to activate, tap again when ready to use extinguisher, will deactivate automatically after a few seconds if not used.
- ENG x N1 xx% - Tap once to start up the engine, ready when green; tap again to switch it off. Displays N1 (Low pressure compressor rotational speed) for each engine.
- THR xx% - Move up/down to adjust engines thrust separately.

- 5.3 LIGHTS
- COCKPIT LIGHTS - keep the button pressed and move up/down to set cockpit lights
- NAV LIGHTS - switch navigation lights on/off
- LANDING LIGHTS - switch landing lights on/off
- TAXI LIGHTS - switch taxi lights on/off
- CABIN LIGHTS - keep the button pressed and move up/down to set cabin lights
- BEACON LIGHTS - switch beacon lights on/off
- STROBE LIGHTS - switch strobe lights on/off
- LOGO LIGHTS - switch logo lights on/off

- 5.4 FUEL
- LEFT TANK - Tap to release fuel
- RIGHT TANK - Tap to release fuel
- FUEL - Move left/right to move fuel from one tank to the other

- 5.5 CHECKLIST
- Tap to open/close the checklist panel
- CHECKLIST panel:
- PREV - Go to previous checklist
- CLEAR - Delete current list
- NEXT - Go to next checklist
- CLOSE - Close the checklist


Keep the button pressed and move up/down to change flaps settings.
Press to extend/retract the landing gear. Make sure to have an IAS (Indicated Airspeed) below "VLO" (Maximum landing gear operating speed) in order to extend it.

Keep the button pressed and move up/down to change spoilers settings.
Tap to switch on/off the ground brake.
Move left/right to operate the rudder.
Tap to switch multiple panel configuration.
Keep the button pressed and move up/down to quickly change the panel.
Press and hold on a single instrument for 1 second and move up/down/left/right to customize it.
Tap to switch multiple camera views.
Keep the button pressed and move up/down/left/right to quickly choose the desired camera view.

Keep the indicator pressed and move up/down/left/right to change the indicator type.


FMC- Flight Management Computer: Open/close FMC panel.
CENTER- Center the map view on your airplane.
Once a waypoint has been selected, press:
"+" to add a new waypoint to your flight plan. It will be automatically added below the selected waypoint on the flight plan. If you have not selected anything from the flight plan, this waypoint will be added to the bottom of the list.
"Đ" (Direct to) icon to delete the entire flight plan and go directly to the selected waypoint.
FMC panel:
RMV - REMOVE: Select a waypoint from the list and press RMV to remove it.
NXT - NEXT: Select a waypoint from the list and press NXT to make it the next active waypoint.
UP - UP: Select a waypoint from the list and press UP to move it to the up in the list.
DWN - DOWN: Select a waypoint from the list and press DOWN to move it to down in the list.
CLR - CLEAR: Clear all waypoints.
DEP - DEPARTURE: Only departure on HD airport. Press DEP to open the SID list, then choose a SID and press SELECT to activate it.
ARR - ARRIVAL: Only arrival on HD airport. Press ARR to open the STAR list, then choose a STAR and press SELECT to activate it.
APP - APPROACH: Active only if an arrival airport exists in your flight plan. Press APP to open the APPROACH list, then choose an APPROACH and press SELECT, then choose the TRANSITION (only HD airport) and press SELECT to activate it.
- TAKEOFF / LANDING
- Choose any of the options available to quickly perform an activity
- DATE / TIME
-
- CUSTOM/REAL: Choose real time or customize any setting
- DATE: Tap on the date to change it
- TIME: Move the slider to change it
- AIRCRAFT
-
- FUEL: Move the slider to change quantity
- PASSENGERS: Move the slider to change quantity
- CARGO: Move the slider to change quantity
- WEATHER
- Sets your current weather
-
- CUSTOM: move sliders to change weather settings
- REAL: real weather conditions
- FAILURES
- All failures are global and apply to all airplanes.
-
- CUSTOM/RANDOM/OFF: Choose your failures, get surprised by random failures or switch them off
- Move the failure list up/down to scroll it and see all available failures
- Move the slider of each failure to set it at the desired frequency or move it all the way to the left to switch it off
- CONTROLS
-
- SENSITIVITY: Set your control sensitivity, the lower the sensitivity, the smoother the response of the airplane to your movements
- INPUT TYPE: Choose your device accelerometer or a virtual joystick. Virtual joystick can be activated in any free part of the screen excluding the HUD area
- INVERT VERTICAL AXIS: Switch to normal or inverted virtual joystick's vertical axis
- CALIBRATE
- Tap to calibrate and return to your flight
- CONTINUE
- Return to your flight
- EXIT- Leave the flight
- If you Exit you will have access to:
- EXIT: Back to main menu
- TRY AGAIN: Restart your flight
- REWIND: Return to your flight as it was one minute before exiting/crashing
- REPORT: End of flight report. Will also appear when switching engines off or after connecting PBB (Passenger Boarding Bridge) and switching engines off
- REPLAY: Look at your replay


- 16.1 ATC - Air Traffic Control
- ATC will allow you to manage communications between your aircraft and different air traffic controllers.
- Start by choosing the correct frequencies according to where you are located, then choose actions according to flight procedures. You will also listen to any communication between ATC and other aircraft tuned on the same frequency.
- ATIS - Automatic terminal information service. Reports a continuous broadcast of recorded aeronautical information.
- GROUND - Used while on the ground.
- TOWER - Used while on the runway, takeoff and final landing.
- APPROACH - Used after takeoff and during initial landing.
- EN ROUTE - Used during flight.
- EMERGENCY - Used to manage any aircraft emergency procedure.
- - REQUEST NEAREST AIRPORT: make a request for the nearest airport.
- - SET PLAN TO NEAREST: set your flight plan to the nearest airport.
- - EMERGENCY/URGENCY: to report current situation.
- 16.2 PASSENGERS ANNOUNCEMENTS
- PAX ANNOUNC. will allow you to manage communications of the pilot and crew to your passengers.
- PILOT – All pilot related communications.
- CREW - All crew related communications.


- 16.3 IN FLIGHT CHAT

MAIN CHAT the same chat as the one in the main menu available to all players. Tap on the top left button to change language.

MULTIPLAYER CHAT named after the server you have chosen in multiplayer. Tap on the top right button to filter pilots by distance.
Available on any HD Airport. Follow map instructions to reach your assigned gate, then reach the parking area following instructions provided by the VDGS. When correctly parked (OK), the PASSENGER BOARDING BRIDGE will become available.
Aircraft not aligned, move to the left
Aircraft correctly aligned, distance in feet to target area

Target area reached, stop aircraft here

Target area overpassed, move back


If enabled, tap to open camera settings For cockpit cameras:

Press and drag on the buttons:
VERT. To adjust camera position
ANGLE To adjust the camera angle
Press RESET to reset the position
Press on monitor name to cycle between monitors
Press and hold on individual monitor name for one second and move up/down/right/left to select monitor.
If the monitor supports it, you can access its custom settings.
NAV and WEATHER have RANGE functionality to change zoom level
9 AIRCRAFT AND LIVERIES
Aircraft menu
Liveries menu
Choose an airplane from the list on the left. You can add planes and liveries to your favorites by selecting the star icon close to their name.
Change livery by tapping on the arrows at the sides of the livery name or tap on the "Liveries" tab to open the complete list.
- CONFIRM: Proceed to route selection
- BACK: Back to main menu
- CREATE LIVERY: Proceed to web page RFS Liveries to download livery templates (needs graphical package supporting .psd file format). Tutorial video instructions: https://youtu.be/FmwjD-TCS4E